Kamis, 30 Juni 2016

Cara Hard Reset Asus PadFone X Mini


Asus PadFone X Mini. Salam jumpa kembali dengan guide belajar, kali ini saya akan share posting artikel tentang guide bagaimana cara melakukan Hard Reset pada Asus PadFone X Mini. Perlu anda ketahui bahwa jika anda melakukan proses Hard Reset maka semua data penting yang tersimpan di dalam perangkat android tersebut akan hilang atau terhapus, Proses melakukan Hard reset juga sering dikenal dengan istilah factory reset atau master reset. Saran saya, lakukan backup secara berkala terhadap semua data yang penting, Perlu anda ketahui bahwa melakukan backup dapat anda lakukan jika Smartphone masih dalam keadaan normal, dan anda tidak mungkin melakukanya dalam keadaan Bootloop pada Asus PadFone X Mini. Device ini merupakan smartphone dengan layar LCD 4,3 inci bekerja pada sistem Android Jelly Bean 4.3 da n prosesor Quad-core 1.4 GHz  sebagai mesin utamanya, serta dikombinasikan dengan RAM 1 GB, kamera utama 8 MP, serta kamera sekunder 2 MP.

Perlu anda ketahui beberapa hal sejak awal sebelum menentukan untuk membeli perangkat android baru, contohnya, bagaimana cara melakukan charge battery, cara mem-backup semua data, cara melepas SIM maupun SD Card. Hal ini tentunya penting untuk langkah berikutnya jika anda sudah memiliki smartphone yang bermasalah dikemudian hari, maka langkah awal yang harus anda lakukan adalah dengan melakukan hard reset, karena hard reset akan mengembalikan kondisi smartphone pada kondisi pengaturan pabrik. Kasus lainya mengapa anda harus melakukan hard reset adalah ketika anda hendak menjual smartphone tersebut. Dengan melakukan hard reset akan menghapus semua data pribadi dan akun yang pernah anda daftarkan pada smartphone tersebut, sehingga anda merasa aman meskipun smartphone sudah berada di tangan orang l ain.

Langkah Hard Reset Pada Asus PadFone X Mini (Metode 1). 

Metode ini dapat anda lakukan jika Asus PadFone X Mini dalam keadaan normal

  1. Pastikan baterai terisi dengan cukup, minimal anda bisa mencharge sampai 70%
  2. Aktifkan smartphone Asus anda
  3. Terlebih dahulu untuk melakukan Back Up pada semua data penting yang tersimpan pada smartphone.
  4. Lanjutkan dengan Masuk ke menu: Setting > Backup & reset > Factory Data Reset > Reset Phone.
  5. Kemudian akan diminta konfirmasi kode keamanan, lalu masukan kode yang diminta.
    Hard Reset Asus PadFone
    Hard Reset Asus PadFone
  6. Pilih erase everything untuk melanjutkan dan mengkonfirmasi bahwa Anda siap untuk melakukan Hard reset pada Asus PadFone X Mini
  7. Asus PadFone X Mini akan melanjutkan proses hard reset, sampai siap untuk digunakan dalam standar pengaturan pabrik (factory default).

Langkah Hard Reset Pada Asus PadFone X Mini (Metode 2). 

Metode ini hanya berlaku pada smartphone yang tidak dapat diakses menunya, mungkin karena terjadi bootloop, atau pada posisi wellcome screen yang terlupakan PIN maupun Active Pattern Locknya.
  1. Pastikan baterai terisi de ngan cukup, minimal anda bisa mencharge sampai 70%
  2. Matikan smartphone Asus anda. 
  3. Tekan dan Tahan secara bersamaan: Tombol Power + Tombol Volume Up selama beberapa detik sampai menu teks muncul, kemudian lepaskan kedua tombol.
    Cara Hard Reset Asus PadFone X Mini
    Cara Hard Reset Asus PadFone X Mini
  4. Pada menu teks ini, pilih recovery dan melanjutkan dengan menekan tombol Power untuk mengkonfirmasi atau OK.
    Hard Reset Asus PadFone X Mini
    Hard Reset Asus PadFone X Mini
  5. Tekan Volume Down untuk memilih  "wipe data/factory reset", kemudian tekan Tombol Power untuk konfirmasi.

    Hard Reset Asus PadFone X Mini
    Hard Reset Asus PadFone X Mini
  6. Pilih < b>"Yes--delete all user data". Gunakan tombol Volume Down untuk memilih dan Tombol Power untuk OK
    Hard Reset Asus PadFone X Mini
    Hard Reset Asus PadFone X Mini
  7. Untuk me-restart handphone, pilih "reboot system now".

How To Enter Recovery Mode Asus Zenfone (5, 6, and 2).


Enter Recovery Mode Asus Zenfone. To day I will share about tips how to enter recovery mode on Asus Zenfone, but before we continoue to do it we must be know about our goal to enter recovery mode on android. What is recovery mode In Android ? I will explain short answer about it. Recovery refers to the dedicated, bootable partition that has the recovery console installed. A combination of key presses (or instructions from a command line) will boot your phone to recovery, where you can find tools to help repair (recover) your installation as well as install official OS updates.

Step By Step How To Enter Recovery Mode Asus Zenfone 5 and 6.

Read this : how to unlock bootloader asus zenfone 2
    < li>First step that should you do is turn off your asus zenfone.
  1. When it was turn off you can continue by press and hold Power Button + Volume UP together for few seconds until your phone vibrate. then release all keys.

    Asus zenfone 5 and 6 recovery mode
    Asus zenfone 5 and 6 recovery mode
  2. It will bring you to fastboot mode.
  3. On this screen you can choice the Recovery. Press the power button to choice menu, To select the other menu you can navigate your volume button.
    Asus zenfone 5 and 6 recovery mode
    Asus zenfone 5 and 6 recovery mode

Step By Step How To Enter Recovery Mode Asus Zenfone 2.

  1. First step that should you do is turn off your asus zenfone.
  2. When it was turn off you can continue by press and hold Power Button + Volume UP together for few seconds until your phone vibrate. then release all keys.
    Asus zenfone 2 recovery mode
    Asus zenfone 2 recovery mode
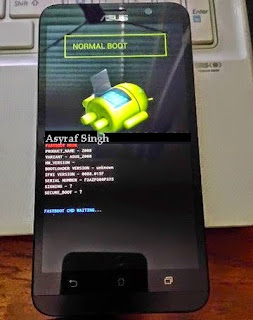
  3. Then your LCD will show likes this picture.
    Asus zenfone 2 recovery mode
    Asus zenfone 2 recovery mode
  4. In this menu you can choice normal boot or recovery boot, select it using Volume Up or Volume Down button.To enter recovery mode you should choice recovery mode.
  5. On next step you will see a sleep android robot like this picture.
    Asus zenfone 2 recovery mode
    Asus zenfone 2 recovery mode
  6. Finally you have entered Asus Zenfone 2 Recovery Mode
    Asus zenfone 2 recovery mode
    Asus zenfone 2 recovery mode

How To Hard reset Asus Zenfone 5.

please follow this instruction guide.

How To Hard reset Asus Zenfone 2.

Please follow this instruction guide.( One )  ( Two )   ( Three )

Rabu, 29 Juni 2016

Acer S500 CloudMobile: Full Specification - Acer S500 CloudMobile smartphone is based on Android 4.0 ICS. Acer S500 CloudMobile present uses IPS LCD touch screen measuring 4.3 inches with a resolution of 720 x 1280 pixels (342ppi).

Acer S500 CloudMobile is powered by a 1.5GHz dual core Krait processor, Adreno 225 GPU and 1GB of RAM. CloudMobile Acer S500 is also equipped with an 8 megapixel camera, HD front camera, 8GB of internal memory plus a microSD slot, 3G, HSPA +, Wi-Fi, Bluetooth, GPS, NFC and 1460mAh capacity battery.
Acer S500 CloudMobile

Full specs Acer S500 CloudMobile :

GENERALNetwork2G: GSM 850 / 900 / 1800 / 1900
3G: HSDPA 900 / 1900 / 2100
Announced2012, 4Q
ProcessorDual-core 1.5 GHz Krait, GPU Adreno 225
SAR Rating
COLORAvailableBlack
SIZEDimensions (mm)127 x 65.8 x 9.9
Weight (g)
DISPLAYTypeIPS LCD capacitive touchscreen, 16M colors
Size720 x 1280 pixels, 4.3 inches (342 ppi pixel density)
Lines0
MenuTouchscreen
DESIGNTypeCandybar
AntennaFixed Internal
KEYSNavigationTouchscreen: Multitouch
QWERTYNo
Soft
Other
Lighting
MEMORYPhonebook
Internal (MB)8 GB, 1 GB RAM
ExpansionmicroSD up to 32GB
BATTERYTypeStandard battery, Li-Ion 1460mAh
Stand-by (hrs)
TalkTime(min)
RINGTONESPolyphonic
CustomizationYes
AUDIOFormatMP3
MP3 PlayerYes
Voice
FM RadioYes
A2DPYes
VIDEOFormatDivX/XviD/MP4/H.264/H.263
RecorderYes, 1080p
TVNull
ENTERTAINMENTGamesYes, Downloadable
MESSAGINGSMSYes
Total SMS
MMSYes
EMSYes
EmailYes
IM
Push-To-Talk
CONNECTIVITYHSDPAYes, HSPA+
EDGEYes
BluetoothYes, v4.0
3GYes
GPRSYes
Infrared (IrDA)No
USB PortYes
WIFI/WLANYes, Wi-Fi 802.11 b/g/n, Wi-Fi hotspot, DLNA
Data CableYes
Data Modem
GPSYes
SOFTWAREJava (J2ME)No
WAPNo Info
Platform OSAndroid OS - 4.0 Ice Cream Sandwich
BrowserxHTML, HTML
Predictive Text Entry
Speech Codes
PIM Application
Others ApplicationGoogle Apps
PERSONALThemesYes
Caller IDYes
Profile IDYes
CAMERALens TypeCMOS, 8.0 Megapixel
Digital zoom
Max. Resolution3264x2448 pixels
FlashYes
Night ModeNo
Multi Shot
FrameTypes
Extra FeaturesAutofocus, Geo-tagging, touch focus, HDR
Photo FormatJPG
Front CameraYes
Samsung has recently launched the successor of its much famous S series, The Samsung S Duos Three. The S Duos 2 performed very well as it gave many features of a high-end mobile at a much lesser price and was a huge hit in Indian budget conscious market. 
The Samsung Galaxy S Duos 3 runs Android 4.4.2 KitKat with the companys updated TouchWiz Essence UX on top. It features a 4-inch WVGA (480x800 pixels) TFT display and supports dual-SIM (GSM+GSM).

Check out secret codes for Samsung galaxy S Duos 3

Samsung Galaxy S Duos 3 Price

Rs.7,999

Samsung Galaxy S Duos 3 Specification 

- 4 inch screen
- 1 GHz Processor
- 780*800 resolution
- Android 4.4.2
- 5 MP camera (.3 MP front camera)
- 512 MB RAM
- 1500 mAh Battery
- GSM + GSM
- Proximity and Accelerometer sensor
- Connectivity options include Bluetooth, Wi-Fi, Micro-USB, GPRS/ EDGE, and 3G

Download Games for S Duos 3

This phone is also going to target the budget conscious market as it gives great features under the tag of 8,000 rupees. Moreover some great features are that it runs of Android KitKat and has a decent screen and camera.

Guide To Install Cyanogenmod 13 ROM for LG G4 (H815).

Install Cyanogenmod 13 ROM for LG G4 (H815). On this guide We  will share to you how to install Install Cyanogenmod 13 ROM for LG G4 (H815). This is open source firmware that distributed for smartphone and tablet based on Android operating system, by using Cyanogenmod fimrware you will  get the features and options not found in the official firmware that distributed by vendors of  LG G4 (H815) devices.

LG G4 (H815) comes with 5,5 Inches wides IPS LCD capacitive touchscreen, 16M colors, work on Android OS, v5.1 (Lollipop) and supported Qualcomm MSM8992 Snapdragon 808 chipset, Processor Quad-core 1.44 GHz Cortex-A53 & dual-core 1.82 GHz Cortex-A57, Adreno 418 GPU combined with 3 GB of RAM as their engine. And you can enjoy exciting 16 MP on main camera, and 5 MP on secondary camera. And this devices released 2015, April.
Install Cyanogenmod 13 ROM for LG G4 (H815).
Install Cyanogenmod 13 ROM for LG G4 (H 815).


On this guide We use unofficial Cyanogenmod 13 rom for LG G4 (H815) based on android marshmallow 6.0, So, if your LG G4 (H815) still using Android 5.1 Lollipop, you must upgrade to masrhmallow first, You can see this guide to update LG G4 (H815), and you can download this firmware on avaliable link below. To apply this guide, make sure that your LG G4 (H815) is using android lollipop 5.1.1 update, also your device must installed TWRP recovery.

Download Cyanogenmod.

To perform this installation you must need to download requirement firmware.

  1. Download this Cyanogenmod 13 firmware. Here
  2. Download the latest GAPPS for Android MArshmallow, Here

Installation Guide.

  1. You must download all requirement file above 
  2. Make sure you have ADB installed on your computer. or you can see here how to installed.
  3. Then, Copy and paste the Cyanogenmod rom and gapps zip file to sd card, Put it on the root of  :
    • /sdcard
  4. If you are not already in recovery, boot  your LG G4 (H815) to recovery mode now. How to enter it :
    • Press and Hold Vol Up, Home & Power button.
  5. Now, In (TWRP) Team Win Recovery Project, select menu choices by tapping on the appropriately labelled button.

    Install Cyanogenmod 12.1 (Cm 12.1) ROM for Samsung Galaxy E5
    Install Cyanogenmod 13 ROM for LG G4 H815
  6. We recomended you to select Backup Button to create a backup
  7. Then, select wipe button, And then select Factory Reset.
  8. Then select Install
  9. Then, Navigate to /sdcard and select the CyanogenMod .zip package.
  10. Now, follow instruction shown on the screen to install the package on LG G4 (H815)
  11. if you are installing multiple packages (GAPPS ), you must install CyanogenMod the first and then install any subsequent packages on top of it
  12. When Zip installation complete, Now Clear cache and Clear Data. 
    Install Cyanogenmod 12.1 (Cm 12.1) ROM for Samsung Galaxy E5
    Install Cyanogenmod 13 ROM for LG G4 H815
  13. Once Zip installation has finished, you can return to the main menu and select Reboot, then System
  14. The LG G4 (H815) device will now boot into CyanogenMod.

Selasa, 28 Juni 2016

How To Quickly Get Your Website indexed in Search Engines Google - Search engines are the main source of visitors to your site. Most people go to your site via the internet after they search on google. Search engines are the most important and most widely used is google. So, if your site is placed in the search engines, you can not get a good and stable number of visitors. Here I will give you some quick tips so that your site is indexed in Google and other search engines.

1) No need to post your site to Google for Indexing: Google and other search engines allow you to submit your site to the list. They stated that it will be many months to catalog your site, and even after a few months does not confirm that your site will be indexed. So, please do not submit your site to google and other search engines for listing.

2) How New Website Installed by Google and other Search Engines: Google bot frequent travel internet sites that have been indexed. This consistency can vary site to site, and it depends on many factors. Every time google bot re-visit any web site, if it finds there is a new weblink to another website, then record it. Now google check this site and if you have not supplied by Googles spider this site too. In this way, Google went from site to site and understand new sites and contribute them to the catalog. This is the fastest of the list.

3) How to catalog your site: The idea is very simple. Go to google and hunt for all the weblogs and message boards that are relevant to the theme of your site. For example if your site is about jewelry then look for this phrase on google. "Jewelry + blog + forum". This collection will you all the weblogs and message boards that are relevant to the subject of jewelry. Sorting collections and find high PR weblog s and community message boards. Now, join the community message boards and weblogs. Choose the coolest subject and began to publish your comment. At the bottom of each post position weblink back to your site and thats it.

 Search Engines Google
Such as community message boards and weblogs are placed in google and well rated, it will re-visited by google within one or two days. Then your site will be found by the google bot and will be included in its catalog. Now bot will visit your site and will be adding the main web page of your website in the source data.

Congratulations, your site is placed in the search engines and Google in a week.

Or, if you have other high PR websites, you can position your new website weblink in the web page for times 7-10. After fewdays, when your site is indexed, you can delete weblink that.
Subscribe to RSS Feed Follow me on Twitter!